
Walking Pouch from a T-Shirt – Full Sewing Directions from Londa
- May 22, 2022
- 4 min read
Supplies
Adult T-Shirt with pocket. (For my middle hip area measuring 43”), I used an Adult Small T-shirt) – but always err on too big to start rather than too small
10” piece of Straight Fusible Stay Tape, or 1/2” wide Fusible Interfacing, or 10” strip of stay tape of some kind.
Sport Elastic: cut to measure 2” less than the center of where you will wear your pouch.
Polyester sewing thread (NOT embroidery polyester thread.)

Directions Cut Pieces 1. Cut 8” across the T-shirt up from the bottom – you will be USING the lower hem.

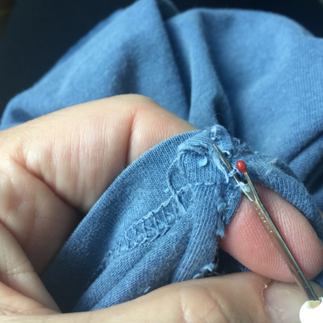
2. CAREFULLY rip off the pocket. KEEP the pocket.


3. Cut additional 8” piece across the T as shown above.
Check Fit
1. Pull the piece you just cut on your body to check for fit. If you used a larger T-shirt, it may be too wide. Slash and seam until it is a fairly close fit around where on your body you want to wear your ‘Pouch’. Realize that the Sport Elastic installed in the next step will give it stability.
ADD Sport Elastic
Press each 8” strip in half along its length so that each is 4” wide. You are doing this to ‘mark’ a center line over which to lay the elastic on the upper piece you cut, the one with no hem.


2. Using the 8” piece WITHOUT the hem (the 2nd piece you cut), open it up so that it a single layer and you can see the pressed line. On the INSIDE (wrong side of the knit, where the stitches look horizontal, not vertical), center the Sport Elastic. Stretch it to fit (the elastic is 2” less long), and zig-zag along both edges using a zig-zag stitch of 3 wide and 3 long. Stitch in the channels of the elastic at either side of the elastic.

Assemble Pieces
1. Right sides together, pin the NON-hemmed edges together. Remembering to change your machine back to a straight stitch (3.0 long), stitch around with a 1/2“ seam allowance. These edges will likely be trying to roll, but you just need to ‘boss them around.’

2. OPTIONAL – you could have fun doing some hand embroidery on the pocket at this point.
3. Locate Pocket as in the photo, flush with top of T-Shirt hemmed edge, onto a single layer of the hemmed edge piece. Stitch back on, following the previous stitching. To do so, start at the innermost edge of the uppermost triangle of stitching and work your way around. Be sure to backstitch to secure. This patch pocket will work perfectly for your ID. This is actually a double layer pocket.

4. From a short sleeve, cut a 2” piece. Cut open and a 10” long piece without the underarm seam included. This piece will be used to reinforce, stabilize the area behind where the cell phone pocket is and over to the patch pocket.

5. Mark some parallel lines for matching when you stitch the final ‘around’ seam. See the photo below. Be sure to use a marker that you can easily see. I used my favorite Chakoner, but the heat-erasable Friction Pen would be great as well.

6. Now – consider if you are right-handed, or a ‘Leftie’. I’m right-handed, so my cell phone pocket, I want easily accessible with my right hand, thus I would ‘situate things as in the left photo below. For Lefties – place on the other side. For these photos to make sense, you have to imagine this pouch ON your body. You’ll need to imagine this pouch on your body for this to make sense.

7. You will also see in the photos above, that the entire pouch has now been folded so that the hemmed edge is towards the top edge – actually, locate an uppermost fold 2” up from the top edge of the hemmed edge (original T hem).
8. Fuse the stay strip to the wrong side of the 10” pocket hem piece.

9. Stitch the raw edge of this pocket piece, right sides together, to the area of the upper portion of the Pouch that is towards the center of where the Patch Pocket is. This will stabilize the area to stand up to all the cell phone ‘in and out’.


10. Flip the hemmed edge of this sleeve piece up, over the raw seam allowance edge and zig zag with settings of sl 3 and sw 3.

11. Now…Match those parallel markings as you fold everything in place, overlapping the T-shirt’s original hemmed edge over the raw edge of the upper part. Pin so that the hemmed edge is 2” from the upper fold as seen below.

12. The white-headed pins indicate the opening I determined using my phone and hand for where the actual ‘opening’ for the cell phone will be. Stitching through both the uppermost and inside layers of the Pouch then needs to be from the edge of the cell phone opening closest to the Patch Pocket, all the way around the Pouch to the other end of the cell phone pouch (in this case, the leftmost pin). See in the photo below, that for some of this stitching, you may well be stitching over the reinforced area. That is OK!

13. The picture below shows what it looks like peeking into the cell phone opening. Be sure to reinforce stitch at either end of the cell phone opening.

14. Now – one final step. If you peek inside the Patch Pocket, you will see a raw, loose edge. Get in there either by hand or machine, and stitch across the raw edge through the layers to secure it. Again – you’ll actually have a double layer ‘pocket’ in this area!. Yeah.
Now…………..GO WALKING!!!! There’s no greater, cooler, safer place than the mall early in the morning.
This concept was seen online, and many are sold in sports stores. I had fun working from a picture I found on Pinterest. Though the concept is not original, my directions are.
Copyright 2018. Londa J. Rohlfing Londa’s Creative Sewing


Comments