
While up-cycling a denim jacket for one of my Elvis Collection pieces this week, I actually had to go dig in my garage for my sample box of tailored pockets in order to refresh my memory on EXACTLY how I finally perfected the Double Welt Buttonhole Pocket. Gheesh - having to do that sure made me feel old! Anyway - here's a closeup of one of the 3 welt pockets I just RE-DID on the Elvis Coat (to be put up for sale real soon). Once I refreshed my mind on the how-to's, I can tell you for sure that ripping out the original red/green flannel plaid welts was FAR more difficult.
One night, in the midst of doing this jacket, I dreamt that I'd put those welts on the right side with FOLDED edges together - EEEKS! I would have been ahead if I'd just have gone out to the Studio to double check. Thankfully, I HAD put them on correctly.
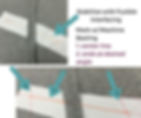
I was reminded AGAIN how VERY precise one must be when doing these pockets. In the image above, center pic, note that the top row is one stitch shy of the end vertical line, and the bottom row of stitching is one stitch over the end vertical. Believe me, that was FIXED before proceeding to the cutting step!
OK - back then to the original post of my method for Double Welt Pockets, posted back in 2016. Back then, below is a photo of my new son-in-law (now Daddy to 4 MORE Grandkids) and that handsome little guy next to him is now 17 and living with us here in TN as he launches into adult life. We are blessed, indeed!

New ‘son’ and Grandson in Wedding Vests with double welt buttonhole pockets.
Constructing classic double welt buttonhole’ pockets is something I’ve perfected for myself over the years, especially back when I made suits for my husband, and SO many blazers for women in my custom dress-making days. Recently in some ‘wedding dud sewing’, I made these great welt pockets once again on vests for my new son-in-law and grandson.
You’ll find many ‘techniques’ out there, but this is my ‘go to’ technique that just makes sense. i also call these ‘Buttonhole’ pockets since the technique is exactly the same as my favorite for constructing bound buttonholes.
Read on for my VERY detailed directions. I suggest that you follow these directions to master this technique:
1. Read and think.
2. Gather a garment base, contrasting fabric welts, and 2 different colors for the pocket back and pocket front…and make TWO samples: one with exact horizontal orientation, and the other with an angled orientation.

Close-up of pocket finished.
Note in the photo above that the welts are cut on the bias. The ONLY reason I did this is because I didn’t want to even try to match them to the plaid in the vest. Since the pockets cut across a dart, it would be IMPOSSIBLE anyway. Granted, I could have tried to make the ‘design’ on the welts actually ‘match’ or chevron, but as small as they are, I decided I would be the only one to know, so I didn’t bother. When using bias for the welts, you should stretch them as you press, to get all of that ‘stretch’ out of the fabric.
MARK THE POCKET LOCATION
The location for this welt pocket is a straight line, horizontal or slanted. Mine for these vests were slanted, higher at the center front end, lower at the side seam end. Usually they are about 6″ wide, but that’s a proportional issue. To mark, I lay the pattern piece with this center line on the OUTSIDE of the garment Front and insert pins exactly at each end. Have the pins go straight through.
The garment fabric will have to be slashed, and will have substantial weight added, THEREFORE, this area MUST be interfaced!!! In fact, even if the entire Fronts are interfaced, I would add an ADDITIONAL layer of fusible interfacing over the pocket area. Cut these (2) interfacing pieces on the straight grain, 2″ wide x 2″ longer than the pocket length. Interfacing selection: Use a STABLE fusible interfacing that has construction; either a woven or weft construction. NOT a knit, and NOT a ‘felt’ construction in this interfacing!
Draw a center line on these interfacing pieces. Add a point for each end location so that you can accurately place them by inserting the points of the pins right through those points. See the photo below, the orange line.
Note also, that this interfacing piece has been slashed so that it goes UNDER the seam or dart excess fabric. If you fuse over a seam allowance or fold, this will give an un-interfaced area that will look like a ‘bubble’ on the outside of the garment.
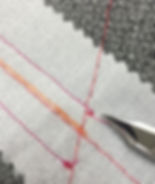
MARK with machine basting length stitches in a contrasting thread color the following locations. Doing this will easily bring these markings to the garment OUTSIDE, which is where you need them because the welts will first be stitched to the OUTSIDE of the garment.
1. Center line – going LONGER than the length of the pocket. For exactly horizontal oriented pockets, these ends can be at 90 degree angles. If the pocket is to slant, these ends should be parallel to the lengthwise grain of the garment. Angled pockets are a tad more challenging to do perfectly than straight horizontally oriented pockets.
2. Ends – at the EXACT angle you want the final pocket ends to appear.
WELT PREPARATION
I’ve come to cutting the welts (2 per pocket) SIX TIMES the desired final width of each welt ‘lip’. I’ve decided to cut them this wide (instead of just 4X the width), because it is easier to press and stitch an equidistant width from the fold AND THEN TRIM THE EXCESS WIDTH TO AN EQUAL WIDTH, than it is to try to stitch exactly down the center of the welt. Especially when the welts are cut on the bias, bias will narrow as folded, pressed, and stitched, so cutting wider, and following as I stated above and is shown in the following image is just easier. Try it…I think you’ll agree!

In the image above,
Step 2: note that the fold of the welt is at the right side of the foot. Further realize that I have moved my NEEDLE to the RIGHT to accomplish the exact width that I desire for the finished welt width. Train yourself to make use of needle position and keep the fabric as fully in contact with all of the feed dogs as possible for accurate stitching.
Step 3: trim the cut edge side to be exactly equal in width from the stitching line to the fold. The stitching line MUST be EXACTLY in the center of the lip.
STITCH WELTS TO OUTSIDE OF GARMENT
The first small photo below shows the first welt being stitched onto the outside of the jacket. The CUT edge is aligned with the center placement line. In the 2nd photo taken with a side view, the cut edge of the 2nd welt has been butted up against that first welt, again right along the center placement line.

The VERY IMPORTANT thing is that the stitching MUST begin and end EXACTLY at those vertical END markings! To accomplish this, keep the presser foot up and hand wheel the needle down EXACTLY at the cross end mark. Take a few stitches in place (or very short length) instead of using the reverse stitching to secure, because you don’t want to go even one single stitch beyond those cross end markings. See in the first photo below that I had overshot that cross end mark by a stitch. YES, this had to be UN-stitched so that it ends EXACTLY at the cross end mark.
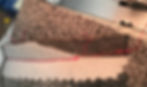
SLASH, CLIP AND TURN CUT EDGE OF WELTS TO THE WRONG SIDE OF GARMENT
The image below clearly shows this process of clipping and slashing. As emphasized in the image. be sure to clip ONLY the garment fabric when clipping to the corners. Do NOT clip through the welts!!!!!!!

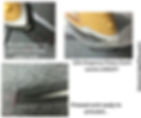
PRESS with STEAM and PRESSURE
The first picture shows that the folded edges of the welts now are butted together after the cut edges are turned in to the INSIDE of the garment. Nothing works better for me than a piece of Silk Organza as a press cloth as you see being used in the photo at the right in the image below. Find silk organza on my website: www.londas-sewing.com
ADD BACK POCKET PIECE
See the image below for cutting back pocket piece of fabric to match the garment. When cutting this Back Pocket Piece, be sure to match any design in the garment fabric so that everything matches when the pocket welts separate. Cut it as least as deep as you might want the pocket, and the same width that you initially cut the welts. Lay this Back Pocket Piece underneath your garment so that the grain matches which will mean that it’s cut edge will NOT align with that of the angled pocket. That is A-OK! Sometimes pockets are located so low on a garment that they are not very deep as was the case with my grandson’s vest. They were just deep enough to safely transport the wedding rings!
The right photo below shows the upper part of the garment folded down towards the bottom of the garment, exposing the seam allowance/stitching lie. The stitching process is then as simple as stitching along this line through the Back Pocket Piece, the lips and the seam allowance, stitching just one needle width further IN, away from the cut welt edge.

ADD FRONT POCKET PIECE
Cut the front pocket piece using a lighter weight fabric, similar depth to back pocket, and the same width as the pocket welts. The grain of this pocket piece really does NOT matter. Attach as shown in the image below by aligning cut edge with the cut edges of the lower welts.

MARK & STITCH SIDES AND BOTTOM OF POCKET

WALA! That’s it…perfect Double Welt Buttonhole Pockets!