Angie’s ‘Fiddle’ Dress
- Aug 25, 2015
- 6 min read
What FUN! It has been an absolute joy and blessing to help design and create the ‘Fiddle Dress’ for my VERY TALENTED young friend, lead singer (and only female) in the local area band: High Cotton. Their band wants to ‘step it up a notch’ for their image, and Angie and I think we’ve GOT IT COVERED with this great dress!
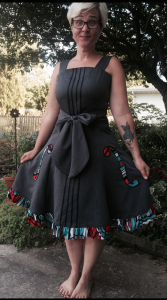
Angie in her Fiddln’ Dress – fit as a fiddle and ready to SING and pick her fiddle!
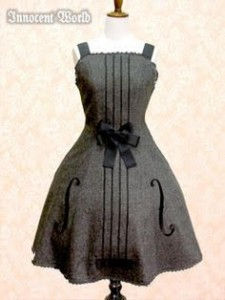
Inspiration Fiddle Dress
The idea is not original – as the inspiration came from an image on Pinterest – see smaller image above. I met Angie at the local chain fabric store and she just started roaming – for a print that would ‘set the tone’ for some excitement – yet go with the guys’ black pant, vest, and white shirts – or even their more casual look of a grey polo shirt (which Angie REFUSED to go along with, by the way!). Rightfully so, wouldn’t you say? She landed on this awesome WILD print, which was a knit – but that was A-OK. We were looking for a print that would work with a solid grey dress.

Wild knit fabric
Diving into my newly organized pattern ‘resource center’, I found a simple princess line dress with a higher neckline and cap sleeves. I calculated how much less fabric we would need since we knew we were making it much shorter, and boy, did I ever calculate it RIGHT ON! We settled on a (boring) polyester gabardine (fine) basic fabric. We aAdded some 3/8″ black grosgrain ribbon, a bulky black zipper (thinking back exposed zip), and I also made a wild guess at 4 yards of red nylon tulle for the TuTu to the purchases, as I knew I had the rest on hand. Basic measurements in hand, I selected the size to cut by Angie’s HIGH bust measurement since it was 2″ less than her full bust. I then measure-checked the rest of the pattern and knew to cut appropriately so that I would be SURE it was BIG ENOUGH for the first fitting. I realized Angie might well desire a lower neck, sleeveless look, but knew I could always cut it down, so I cut the pattern as designed for the neckline and the cap sleeves. I also cut five 4″ wide cross-grain strips of the print for the lower skirt peeking ruffle. Then, I went on to create the TuTu – following the directions you can find in this BLOG POST which start from The Sewing Loft’s TuTu Tutorial, and ADD my additional techniques. For the first fitting, I used a fairly long stitch to stitch all of the basic dress seams. With the TuTu on, and the dress on Angie INSIDE OUT, (with appropriate undergarments worn), we did the first fitting. The finished length was established and I ‘attacked’ the neckline with the dress still on her, changing as I had thought she might want – which does give her much more unrestricted movement as she does her fiddle playing. The bulky black zipper wasn’t long enough to open the back enough to get the dress on, so that idea went by the wayside.

Gathering Foot Gathers the Ruffle
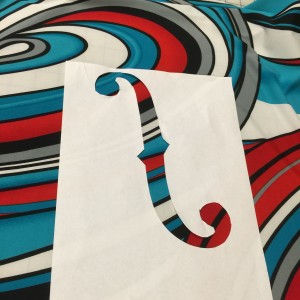
For the first fitting, I also created the lower ruffle from the 4″ wide knit print strips pieced together. I experimented, and found that using the Gathering Foot, with straight stitch (lengthened to 5 or so) in the left needle position, and my hand held pretty firmly behind the foot, that I could gather this strip SO EASILY! To do this, be sure to put the fabric COMPLETELY under the foot, NOT in the slot! We ‘googled for’ an image for the F Holes for the dress skirt appliques. The very first one that we selected, when printed, was PERFECT SIZE! I cut the shape OUT, creating a window so that Angie could play and decide exactly exactly the shapes and colors of this wild print for each F-Hole. I chalked around the paper, and snapped a picture of each of them with my iPhone. WHAT a sewing tool – our camera phones!!!
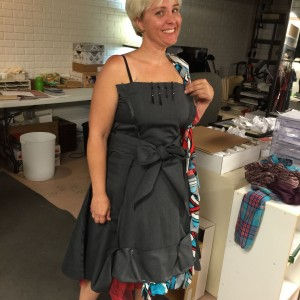
Angie excited at first fitting
Left Skirt F-Hole Placement
Tasks then for the 2nd sewing session included: * Creating the waist sash – Finished at 3″ wide, and I made it shaped, so where it would be ‘knotting’, it would be a bit less wide and bulky. I had calculated the length during the first fitting and also decided that this was the perfect solution to covering the back ‘excess’ at her sway back waist (EZ solution!). * Securely stitching the seams and serging to finish. This included clipping so that the seams would lay open properly. * Inserting the red invisible zipper to allow it to ‘peak’ just a tad – which turned out looking GREAT!!! I had determined that perhaps some boning up the back princess seams would be helpful – so I added those.
Stitching the invisible zipper a bit further away from the coil allows the color to ‘pop’ on the back of the dress. * Create 3″ finished wide straps. I securely integrated them into the front finish, and will ‘fit’ them at the back – to be sure they cover the angle of her bra straps. Lingerie straps may well get sewn on at the shoulders as well. * Cutting off the excess hem allowance, allowing for a 1/2″ hem depth. I serged on a bias cut strip of fusible tape, sticky side UP. This was then fused up into place.

Wonder Tape placed along inside at hem to hold ruffle in place.
* Adding the ribbon ‘fiddle strings’ was probably the hardest part of this entire dress! I pressed in the center front fold, then laboriously pinned the 3/8″ grossgrain ribbon ‘strings’ on either side of it then on either side of THOSE. They have about 3/4″ between each ‘string’. I measured and pinned and pinned and measured, then when I went to zig zag them on (with black thread right down the centers of each ribbon), the pins started coming out – SHEESH! So I just ‘eye-balled it’ and it seemed to work OK.
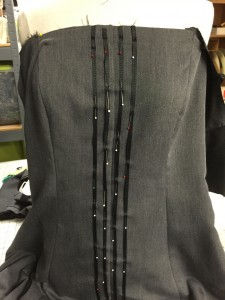
Pinning on the Fiddle ‘Strings
*Wonder Tape placed on the inside of the fused up hem allowance easily held the gathered ruffle in place so that I could then twin needle stitch from the right side to attach it.
Outside Twin Needle Finish Hemline Inside Hemline Ruffle Above, you can see the finished ruffled hemline. I really like the twin needle finish. I’ve also included a snapshot of the inside ‘finish’. I know it isn’t pristine, but for this dress, it works just fine IMHO. I could try to serge it – but as soon as I’d do that, I’d undoubtedly cut a hole in the dress, so NOT GONNA! We had decided to cut a healthy inch off the depth of the ruffle at the fitting – which I did, so it was a full 3″ wide to do this finish. That’s a RAW CUT lower edge, by the way! It can still be cut shorter if the artist so desires.
You can also see that I created the facing for the upper bodice finish. I elected to stabilize the upper edge by fusing a wide piece of straight fusible stay tape to the upper edge on the inside, and using a straight grain finished band for the ‘facing’. Note in the photos above how I also stitched the ends of this facing to the zipper tape, right sides together BEFORE I finished the uppermost edge. I have left 1″ on either side of the side seams of the upper edge UN-finished to allow for some last minute fine tuning of the fit. Then…for the ‘F-Holes’

Testing Applique Stitching
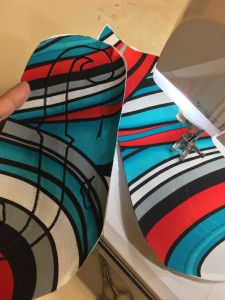
Since the fabric was a knit, it was clear that it needed firm stabilization to become appliques! I dug into my (newly organized) Stabilizer Resource Center and found Heat n’ Bond Lite. Then, I carefully drew with my Pilot Frixion Marking Pen inside those F-Hole ‘windows’. For the Stitch…..I knew for these curves that the ‘lightning stitch’ would be better than the conventional zigzag stitch. The Lightning Stitch (the name we gave it at my shop years ago) goes straight across, then angles down as the needle swings to the left. It just works better on curves. I’ve pictured this stitch above. I had the left swing of the needle meet the drawn line so that the applique didn’t get smaller, but a tad bigger. The width I decided on was 3.0 wide and length: .6. I did practice a bit – and remembered to put on the applique foot (groove underneath foot to allow for the ‘mountain’ of thread to feed under). The tension default seemed to be fine. After stitching, I CAREFULLY cut very close to the stitching. THEN I attacked these pieces with my fat MAGIC MARKER in black to ‘fill in’ the white spots, and to ‘paint’ the little bit of fabric still remaining on the outermost edges. See the difference below…I ‘colored’ on the left one. The right one is original as after stitching and trimming. Brilliant, eh? And I know they are not perfectly symmetrical – but that’s OK. Moving target philosophy………..

‘Coloring’ the edges of F Hole Stitching. Note how much ‘cleaner’ the left ‘F’ applique is than the one on the right.
I had ‘lost’ the planned location for these appliques on the skirt, so fusing and stitching them on had to wait until ‘Pick Up Day’. Final Alterations: We had to scoop out under the arms so it didn’t cut into her armpits. Did that twice. 🙂 Did precise, exact strap length. Tacked the bodice facing at the front by stitching through the ‘strings’ (black ribbon) for about 1/2″. I also had to slash the facing to allow the lower edge of it to expand – then those edges were turned under and hand stitched. Not ‘couture’, but it works for this stage dress. I fully know that, properly done, this dress should have a full corset inside, fully boned. etc. etc. etc. In lieu of that (time constraints), what I did worked. I was most concerned that the upper edge not stretch out of shape – thus the staying with fusible stay tape and using a straight grain piece for the facing. I may still end up re-cutting shaped facings to ‘properly’ finish that upper bodice edge. We’ll see… AND – we finished the F=Holes. After determining the exact placement , I fused them down AND straight stitched with black along the innermost edge of the zigzag stitching – slowly and carefully with a short stitch length to allow for lots of pivoting. AND – finally, we decided to cut the loops at the bottom of the TuTu =- and made it shorter so it just ‘peeks’ out of the skirt. Actually, doing so seemed to make it hold the skirt of the dress out even moreso. SUCH FUN!!!!! Can’t wait to see her perform in it Labor Day Weekend at the Sweet Corn Festival in Hoopeston, IL!


Comments