Iconic Rock n' Roll T-Shirt + Nike Pants = New Jacket
- Londa
- Oct 6, 2022
- 4 min read
Updated: Jun 28, 2025
Sew... I was getting tired of stitching on black and grey, so on another recent trip to Memphis where our grandson 'had' to go to check out the Nike Outlet, I also added some more rock n' roll T's to my creating 'stash'. I was thrilled to find this 'pink' T-Shirt, and again, it has the same picture on both the front AND the back of the T-shirt. The front of the shirt has some added 'bling' - but that is on my work table as I type.
Starting with.... that T-Shirt and these red poly 'parachute' styled pants that are fully lined and VERY cool seaming,

Here's what I ended up with after a 10+ day process. It all 'came together' after multiple peeks into my STASH and finding the print poly init and fuchsia acrylic sweater fabric.
I DID take all these fabrics, and 'set' them with Synthrapol in a cool water 'bath'. However, this jacket is also lined and I have labeled this as Dry Clean Only care recommendation.
AND.... notice that in order to not have 'E-L-V-I-S looking off to the side, I lapped it left over right instead of right over left as women's jackets are supposed to be.

Back to the creation process:
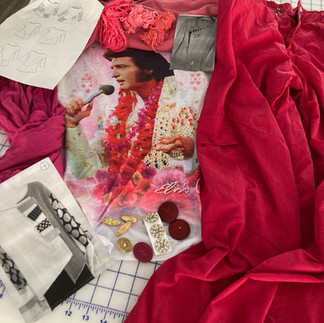
Photo 1: Gathering together every fabric, trim, styling idea.
Photo 2: Adding possible buttons.
Photo 3: Refined choices (at least to start with).
Honestly, I'm not sure how I morphed from the Kayla Kennington Vogue Top pattern as pinned to the mannequin on the far right picture to a jacket, but that's what happened. (Actually, I created another color-coded Kennington Top as well, using the front of the T-shirt - which has sold!).
The color combination was a problem from the beginning for me, because the flowers on this T -Shirt are both warm undertone (coral-ly) and cool undertone (fuchsia-bluey).
I CAN'T DECIDE IT ALL TO GET STARTED!
With only the 'stuff' gathered, I started out by 'diving in' as I call it, cutting into the T-shirt.
It was obvious very quickly how sheer this knit was, and that I'd need to underline it. Not a problem: I just went to my bin of T-shirts in the garage and pulled out a white T-shirt.

Once again, I 'quilted' the white T-Shirt to the Rock n' Roll T using Clear Monofilament Thread but this time, I stitched around the head, clothing, hand, microphone, etc to make the 2 T's function as one.
NEXT: HOW TO UTILIZE THE PERFECT RED PANT 'FABRIC'
The legs with drawstring hems became the Sleeves. The remaining 'fabric' yielded the jacket Back - but less the yoke. That was just another design opportunity.
Here's what I ended up with for the Back Yoke - which I like because it brings the fuchsia knit used for the Right Front to the Back, as well as with the collar of the print knit - that is 'seen' from the back of the jacket as well. The 'fringe' along both sides and bottom of the yoke V of a scrap of pant fabric is the selvage of the lining that I did have to go and purchase.
Note also in the closeup below, that I again 'quilted' through the fuchsia acrylic knit to a stable fabric 'under-lining' for the yoke. Alone, the stretch of the knit if left UN-stabilized, would just not have 'behaved' with the firm weave of the polyester pant fabric.

Here you can see the very interesting seaming that I was able to feature - as it was in the beginning - of the pants.

Yes - I just kept the cargo pockets of the pant at both side hemlines of this jacket.
Fabric Combination
It wasn't until I looked one more time in my stash 'Red Box' and found the fuchsia acrylic knit piece, that this jacket started to really fall together. I absolutely positively believe that to do UpCycle Sewing, one MUST HAVE A HEALTHY FABRIC STASH! That 'fabric' can be anything - clothes, ties, trims, buttons, interfacing, threads, yarns.....
The right Front of the acrylic knit was channel-quilted to a stable fabric to add body and 'make' it non-stretchy, as the rest of the garment had become.

Note the waistband of the pants pinned to the bottom of my dressform....I was toying with using that as a neckline finish - which was obviously needed as you can see from the picture above.

Oh - and PATTERNS! Unless you have pattern-drafting/draping skills beyond the norm, you'll need PATTERNS!!!!
I had 'landed' on this pattern as the basis of this jacket, having made it last fall for myself and LOVING IT!!! The collar is truly face-framing and quite nice.
The printed poly print had ALL the colors of the garment in it - so I decided it was the PERFECT solution for the collar, even being ONLY the collar.
To achieve the 'stand', I interfaced double layers of woven fusible interfacing on the upper (public side) collar and one layer also on the under collar piece.
To make this jacket EXTRA nice, I also bound the armholes with a bias binding, and did a conventional jump hem at the lowermost edge. It's been quite awhile since I've done 'traditional' tailoring, so I enjoyed this handwork in front of the TV in my lounging chair.
CLOSURE
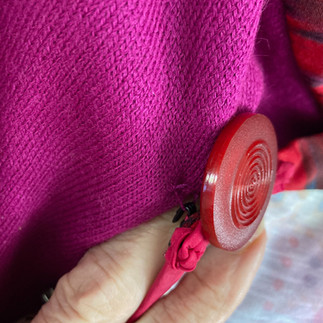
For some weird reason, I always seem to hit the wall when it comes to the perfect closure on my upcycle garments... I initially did a hook and thread-crocheted loop, but that seemed to 'show, so then I added the antique button and THEN...also, the bias skinny turned tube.

This one-of-a-kind unique garment is available for adoption - with FREE SHIPPING to USA destinations at the link below.
HELPFUL HOW-TO VIDEOS
I have videos for both the crocheted thread loop and the skinny-turned tubes at my YouTube Channel - so I'll share them here. Both are skills that I find quite useful!


Comments