Sweater MakeOver Sewing Project
- Jan 18, 2016
- 6 min read
The Way I Do It……..
OK, this doesn’t mean it is the ONLY way – but after YEARS of creative sewing, designing, observing and teaching . . . I’m convinced that the process I share below is the best way (at least for me) to sew, be the ‘boss’ and have to have FUN while I do!
Do Not try to make ALL decisions about a garment before starting. DIVE IN!
For the type of garments I love to create, I KNOW this is true and find this the method that ‘works’ as I teach gals to ‘let go’ and HAVE FUN! Once my students ‘get the picture’ and allow themselves to GET STARTED, they are off and running…..
Here’s the CLUE: You have to make ONE DECISION at a time – perhaps with the next one ‘in mind’, but you MUST make and commit to ONE thing and DO it – that means CUT and SEW it! Remember…Un-Sewing is ALWAYS possible.
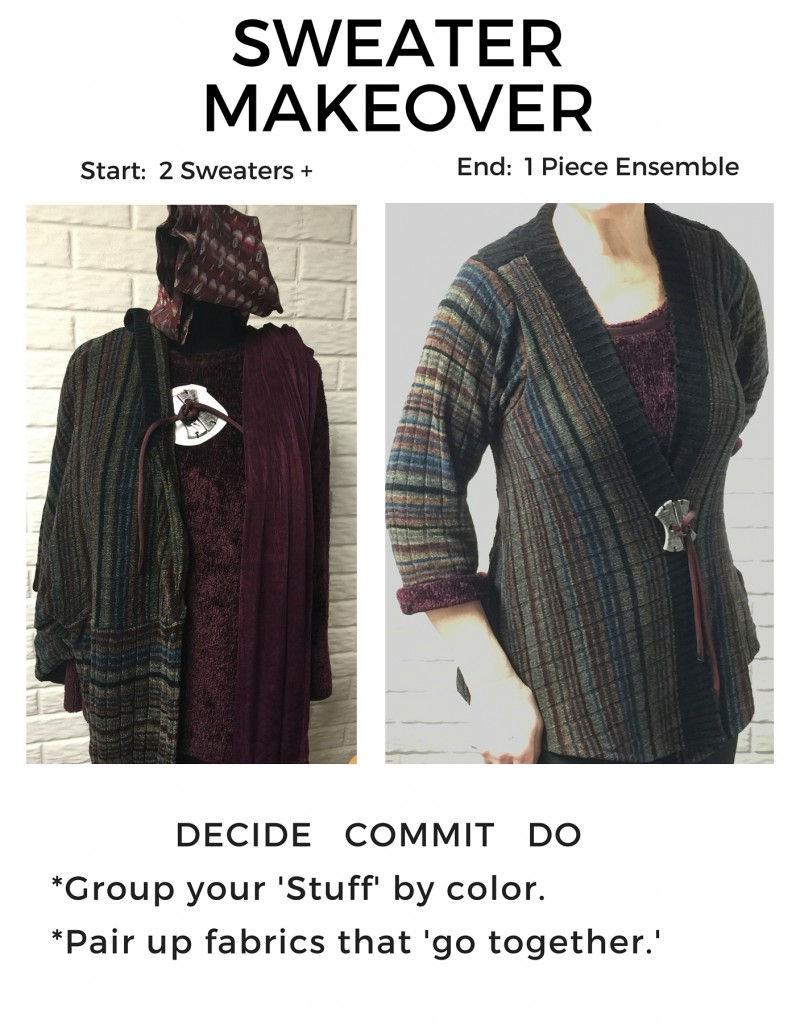
Join along in this process with me as I transform 2 sweaters and a man’s necktie …..
Step 1
To start out – I just knew the neckline on the burgundy sweater was too high – never wore it because of that. So I marked the depth desired and proceeded as below. I’m using my absolute FAVORITE marker the Chakoner. This is the most popular notion I sell on my website – so if you don’t have one, you might want to check it out HERE and order yours today!
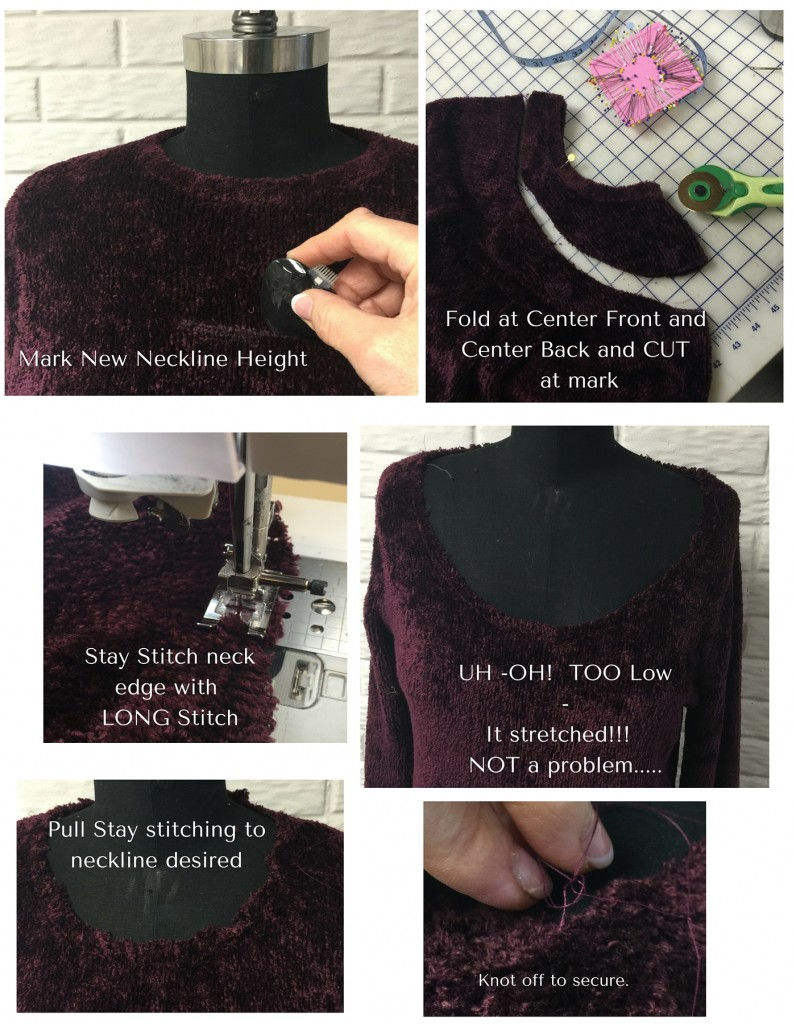
Step 2
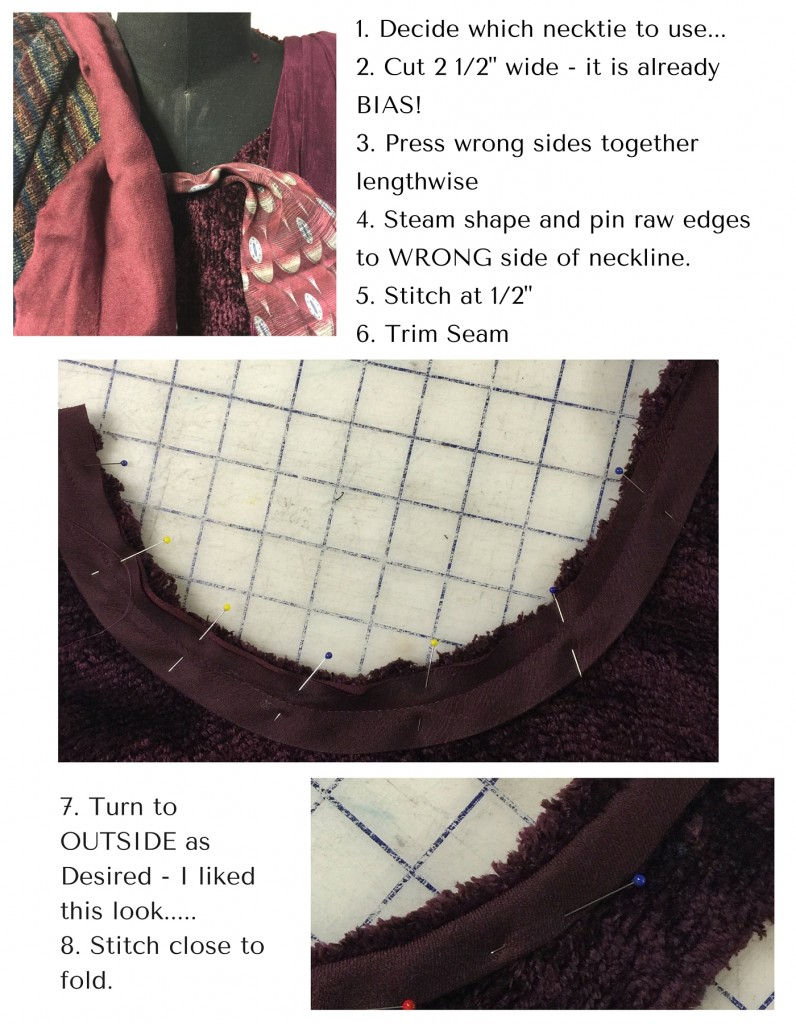
I knew I wanted this neckline bound – so I went ahead and did the entire front and back necklines, knowing if – by chance – I ended up only using the front, I could always ‘cut’ it at the shoulders to add in the jacket portion. See steps below.
Step 3
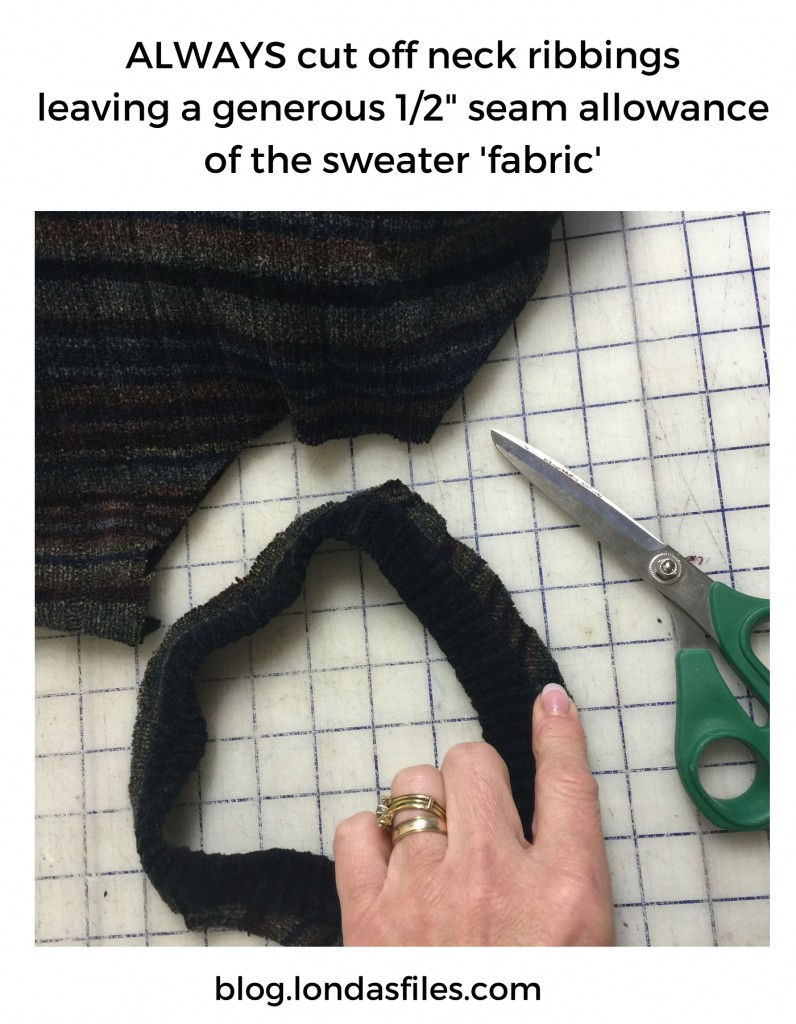
Now…How should I make use of the striped sweater? I knew the pieces would be used separately, so I just carefully cut right in each seam to separate the parts. I also cut the sleeves off, and opened them up flat by cutting the lower sleeve seam. The Front was cut separate from the Back at shoulder and side seams. Neckline Ribbing: I ALWAYS CUT THEM OFF WITH a seam allowance – Just in case I might need it! At this point, I had absolutely NO IDEA if I would be using this or not, but ya never know – so I cut it off as below and PUT IT IN A PLACE OF IMPORTANCE – NOT with the ‘scraps’!
Step 4
Now comes the REALLY fun part – DESIGNING.
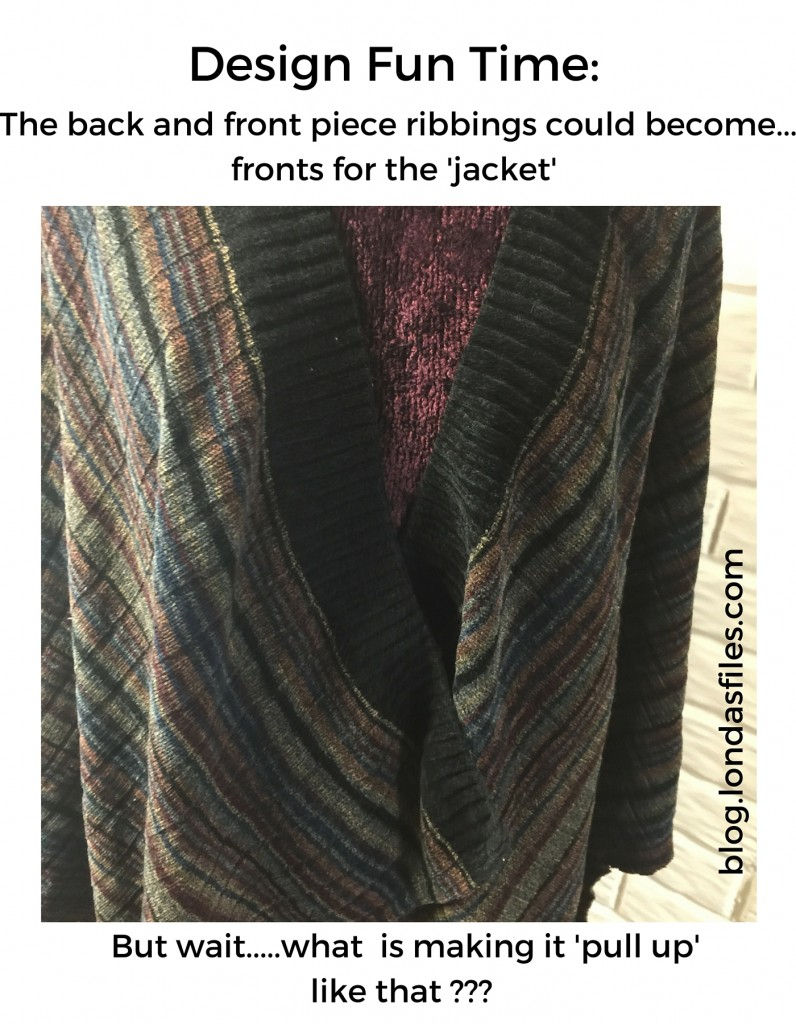
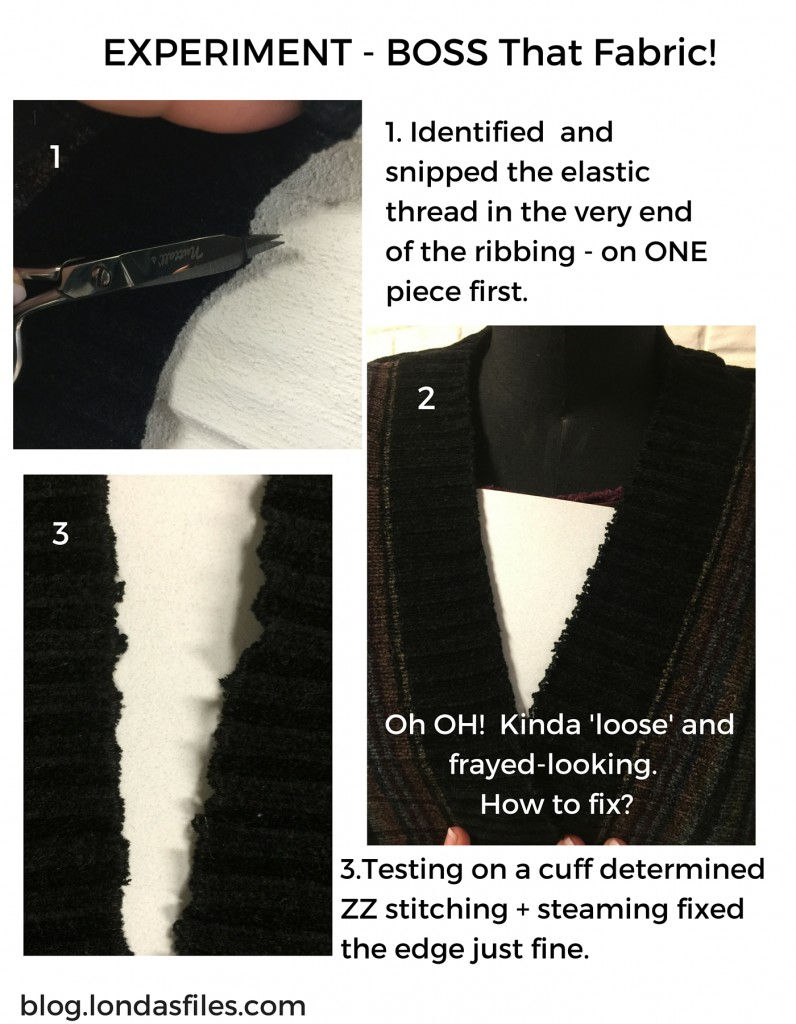
The lower ribbing of the Front and Back of the striped sweater pulled up, curved as I played with them as new ‘jacket’ fronts. Upon closer inspection, there was a double row of elastic thread in that edge of the ribbing. I cut that elastic out of one side, but was disappointed because it left the edge ‘frayed’ and delicate-looking. However, having done one side, I obviously had to do the same to the other side, so I did. Experimentation on one of the cuff ribbings I’d cut from the sleeves showed me that I could zigzag that edge, then steam it to control the waviness from stitching. See the Image below. ‘Challenge’ Solved! Do NOT let yourself get ‘stumped’! Perhaps take a break – go get something to eat/drink, take a short walk – or some days I even take a shower, then come back fresh.
Step 5
Implement & Construct
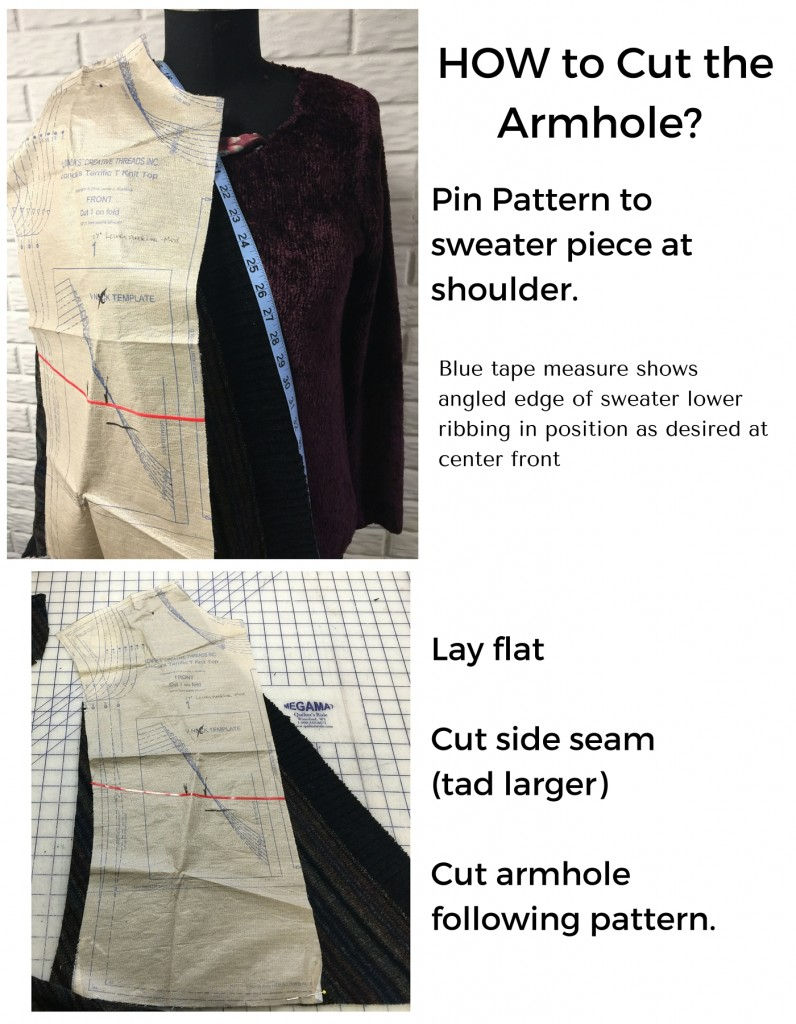
At that point, I knew I needed to have shoulder seams and armholes and side seams to these new ‘Front’ Pieces – whether it became a separate jacket, or the outermost ‘Fronts’ of a 1 piece garment…so It made sense to lay my Knit Top master pattern onto these pieces. I find this all easiest to visualize on a dress form of some type. The one shown is not ‘my size’, but it works. The right Front was pinned at the shoulder, then the pattern attached to the same place with a pin. Flat at the cutting table, it was easy to cut the shoulder, armhole, and the side seam – which I cut a bit larger and the same length as the burgundy sweater at the side seams. Think ahead – always think ahead! If in doubt – ALWAYS cut larger rather than smaller.
Step 6
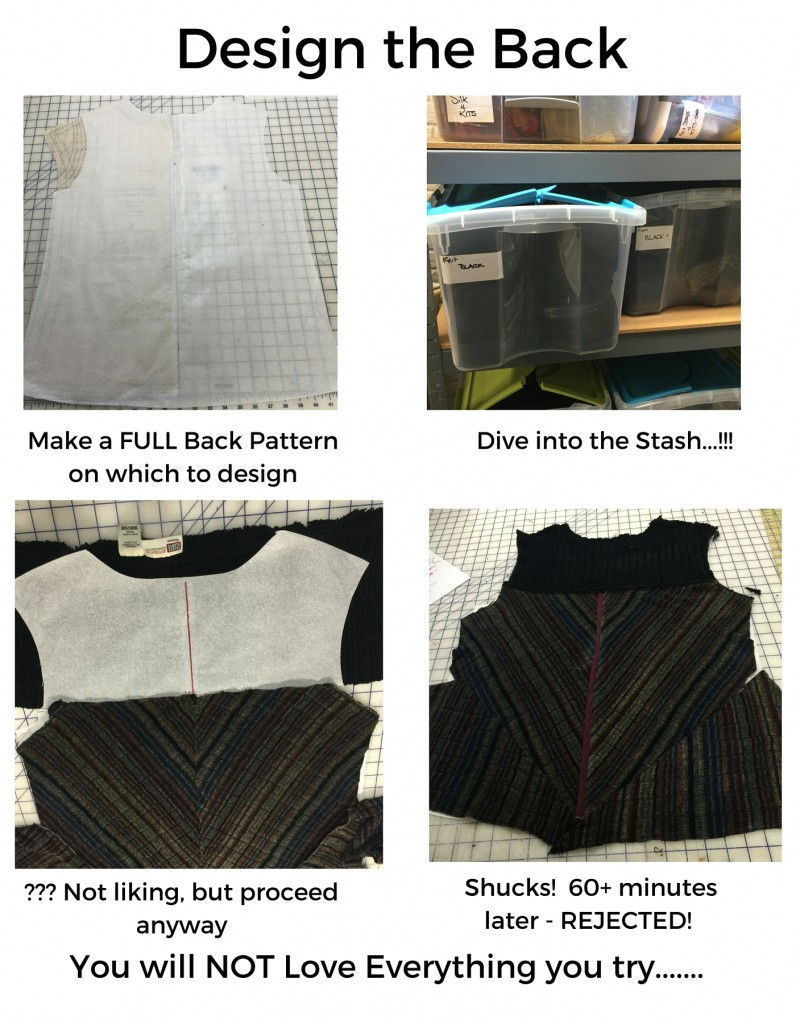
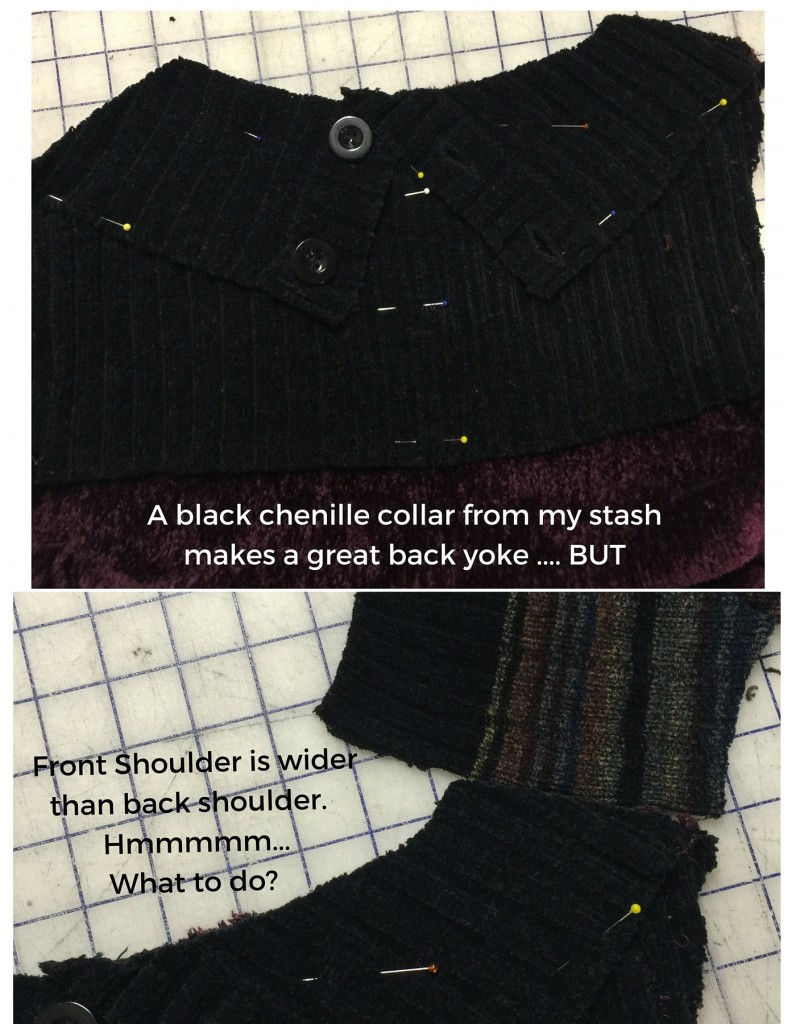
Next: What about the Back? I had limited fabric left from the Front and Back sweater pieces, and of course the sleeves, so I decided to play with doing some ‘piecing’ with the scraps and some other ‘goodies’ I found when I took a ‘dive’ into my Black Knit Fabric stash bin. The following image took me at least an hour, and I ultimately did NOT like it. I find if I don’t like something, there is little use to trying to convince myself otherwise, so it was time to ‘scratch’ that effort. I switched to only using a black collar from my ‘stash’ as a yoke over the back of the Burgundy Sweater for the Back of my new garment. That led to cutting the burgundy sweater I had already bound at the neck apart at the shoulder seams. Doing this meant that my effort to bind the entire neckline had been a ‘waste’, but this type of ‘change’ is just part of the creative process as I see it. Get on with it – do not beat yourself up. Life does that to you, you don’t need to do it to yourself.
EXPECT some things to NOT work out. Every garment you start, or part of a garment you work with will NOT be a success. Kinda like life, eh? Anyway – do you LOVE everything you buy? You had a chance to try it on, correct? Bought it anyway and don’t wear it? Give yourself some slack!!!
Step 7
New Back Design. My apologies if you can’t see the details since it is black. However, this was a large collar of black chenille with a button side detail that I’d been ‘hoarding’ for a long time. It worked perfectly to use as a yoke. I cut it to fit the back of my top. I stitched around the neckline, shoulder and armhole edges, and also a few places within the expanse to hold it securely to the lowermost burgundy sweater layer.
Step 8
Do you see the challenge in the lower half of the image above? The striped pieces with lower ribbing on the Fronts created a longer shoulder seam than that I had constructed the back from. Laying the Fronts and Back together at the shoulders revealed this AND let me know how much I’d have to ‘grow’ the back at the neckline edge. What with? Ahhhhh one of those CUFFS! AND, lesson learned, I had NOT cut the elastic thread out of the edge, so it would even nicely ‘hug’ my neck. YEAHHHHH !
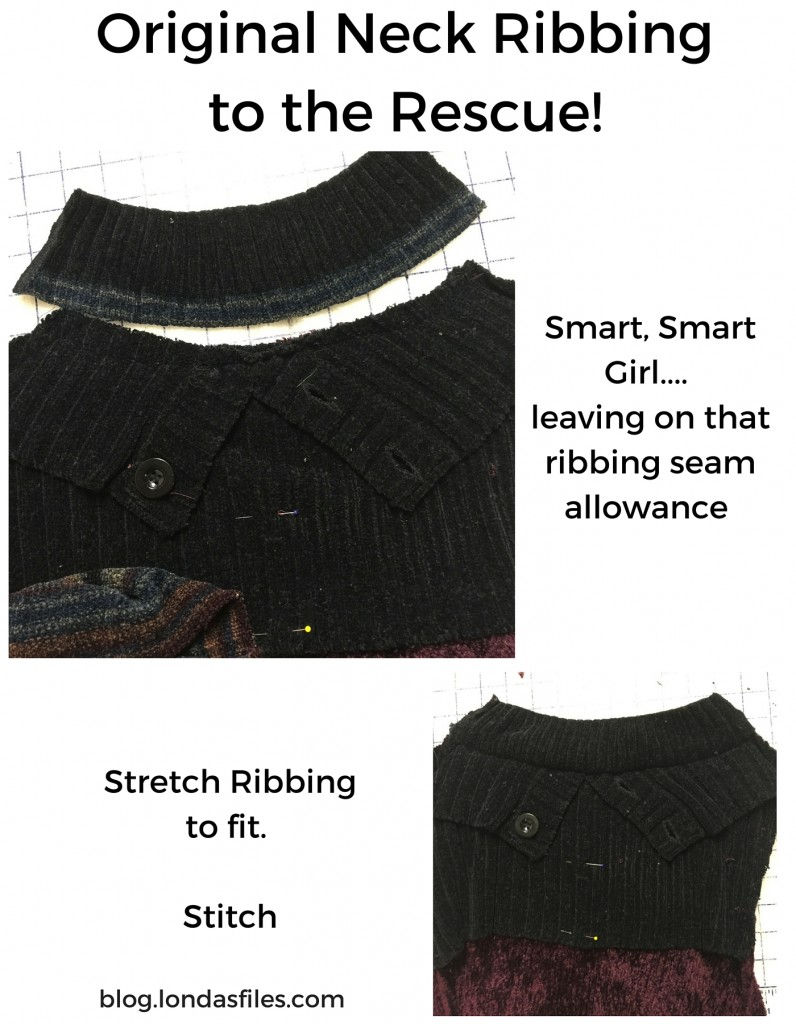
The seam allowance edge of the Cuff stretched easily to fit the back neckline. I LOVE sewing with knits as you can really ‘boss’ them around and they generally obey!
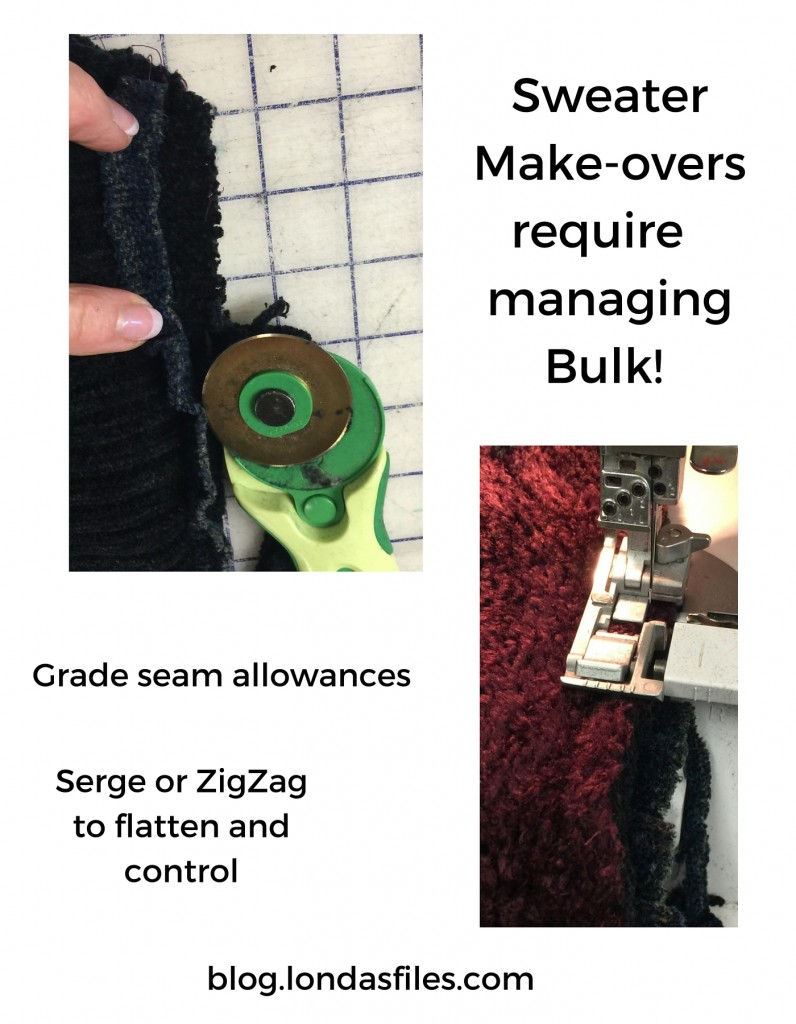
Knits do provide the challenge of BULK. I graded this cuff to back neck seam allowance, and then serged to finish as shown in the image below.
Step 9
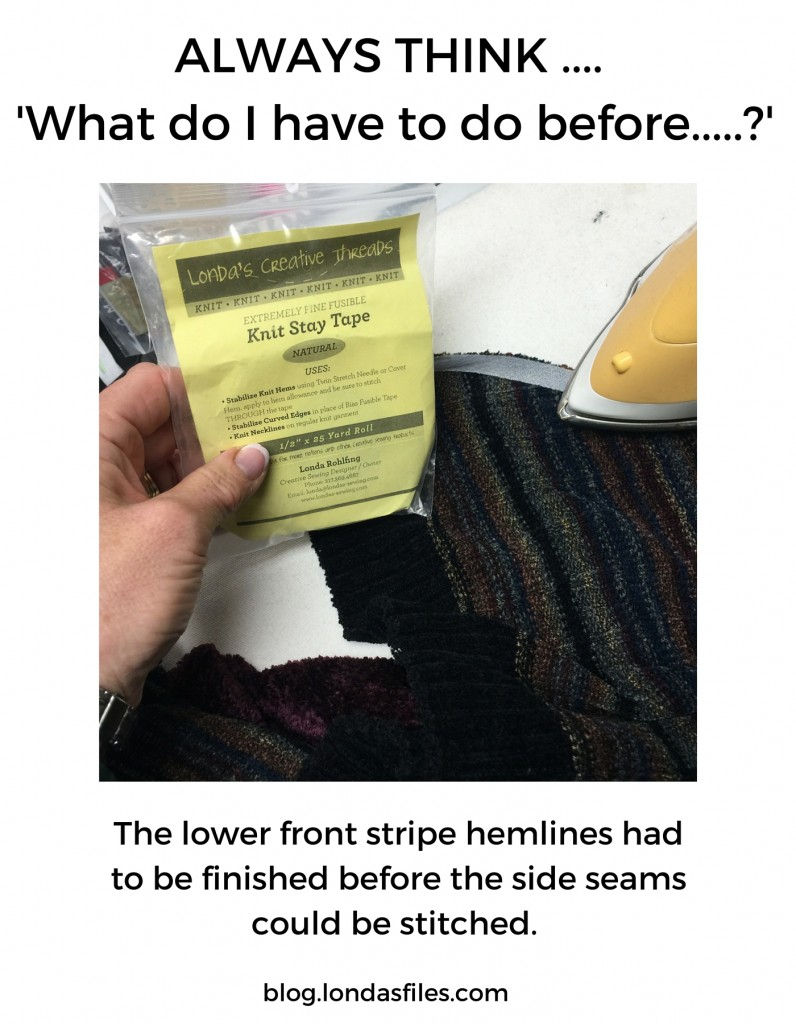
Fronts and Backs constructed, and overall plan for this to be a 1-piece (but look like 2 pieces) top, the next step was to stitch the side and shoulder seams. When I cut the Fronts, I had cut the side seams the same length as the Burgundy Sweater to start with. Before stitching the side seams, the lowermost edge of the Fronts would need to be hemmed. Generally just remember: Horizontals need to be finished before verticals – not always, but often. I stabilized this hemline edge by fusing Knit Fusible Stay Tape to the wrong side, serged, then pressed up and stitched. EZ!
Step 10
The only decision and construction left was the SLEEVES. I had the choice between the Burgundy solid sweater sleeves or the striped sleeves. I decided on the Stripe – though either would have worked. Scraps of the burgundy created the ‘fur-like’ Cuffs. The 2 piece fimo clay closure was stitched on using heavy buttonhole/carpet thread, and is stitched through both fronts and burgundy sweater as this garment pulls over my head to get it on anyway.
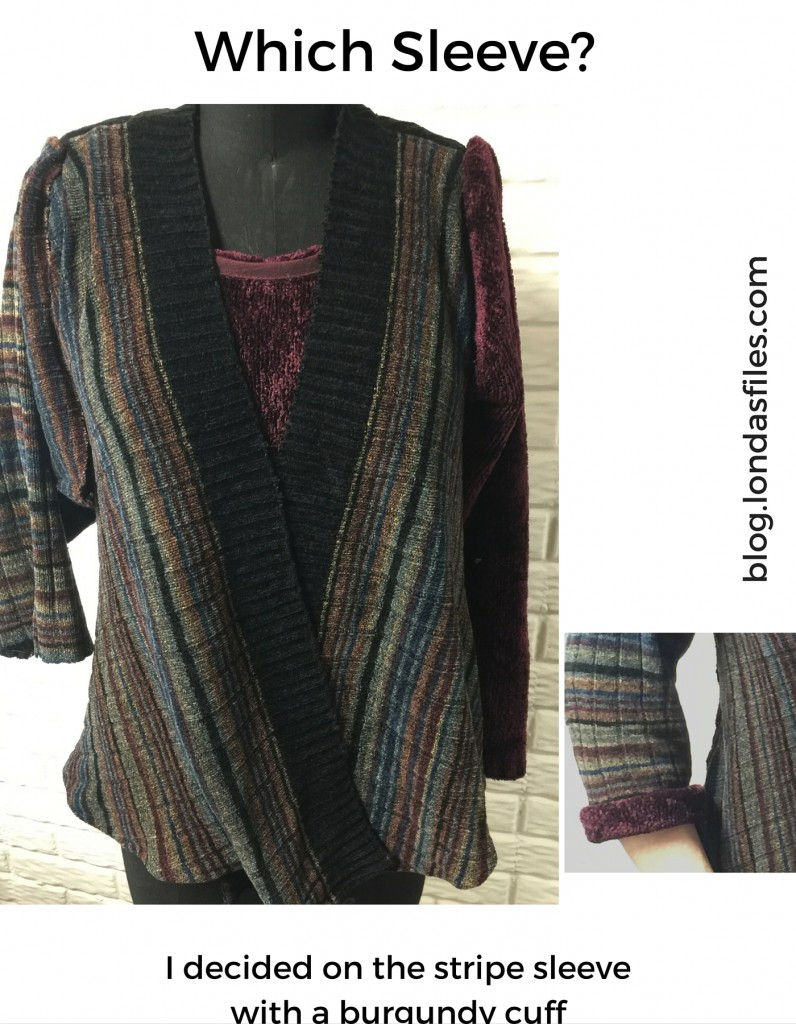
And……the result. I love it.
Please Comment below on what you may have learned from this Blog. Commenting on my Blog is very important for the’Blogosphere’.
Comment and let me know you did so with a quick email to me at londa@londas-sewing.com so I can send you your FREE GIFT!
ADDENDUM…. I’m ‘on a roll’ Next Project. For the Result, check out my Pinterest Board HERE to see what I created with my Mom’s 2 piece ‘St John’ knit ensemble and Daddy’s silk T-Shirt.


Comments