


Memory Doily Headboard
- Londa
- Sep 19, 2019
- 6 min read

I love lace – especially crocheted lace – ones I remember on furniture in my childhood home. When I started dreaming up my ‘Memory’ Guest Bedroom decor, I knew my collection of precious doilies would have to play a BIG part. Of course, I let my finger do the research on Pinterest, and came up with many ideas. You can see many of my inspiration pins at my “Linen Decor’ Pinterest Board HERE. As you look at my collection of ideas, it is obvious that what I did with my doilies is NOT an original idea.
However, I CAN claim this ‘How-To’ process as mine, because I didn’t really find any tutorials on how to create my inspired idea for the ‘headboard’ as you see it below in my room. Believe it or not, I ‘hung’ it using velcro and yardsticks. And…I did it ALL by mySELF! I was thinking of making a whole litter of more ‘memory’ lacey pillows, but as I look at this photo, I’m thinking that if I do, the bed full of pillows would compete with the headboard. I welcome your inputs in the COMMENTS section below!

Sew…. here’s how I went about creating this ‘doily’ headboard.
BACKING FABRIC
I selected a solid canvas-like 54″ wide deep aqua fabric for my ‘headboard’ whose final dimensions over the queen-size bed are: 30″ x 60″. The 54″ width of the fabric easily accommodated the 30″ height, but the needed 60″ width meant that I needed to purchase 1 2/3 yards of the backing fabric. I cut my backing fabric 33″ x 63″, allowing for 1.5″ border on all sides to wrap around to the wrong side. If I were to do it again, I’d add 2″ extra per side, so I’d cut it 34″ x64″.
My doily collection contained many MORE doilies than what you see here. Some of the doilies are VERY special. In fact, the largest one at the left is one my Mom gave to me years ago, telling me it had been used on her baby buggy! The other 2 special doilies are the one at the lower right-hand corner (that I distinctly remember under the lamp on our ‘piecrust’ mahogany table, and the ecru one at the middle top placement is one recently given to me by my Aunt Mildred (mom’s sister).


I even have evidence that the largest lace IS from her childhood, as it can be seen at the base of the photo at the right if you look REAL closely. In fact, I even have the crocheted bonnet my mom is wearing in this picture. It now hangs from the harp of a dresser that was my Grandma’s here in my ‘Memory’ room.
As I planned the doily placement, I did work to have a mixture of colors included, carefully distributing the more ecru ones to achieve a good balance of color. Below, compare my 2 ‘plans’. The first one (at the far left in the picture to the left above) didn’t have the ‘layering’ of doilies that I ended up with, as seen in the photo directly below. Honestly, there isn’t any ‘right’ or wrong’ to this, but just trial and error. Precariously standing high up on a stool to snap a picture proved to be very revealing as those photos provided a better ‘bird’s eye view’. I used lapping and layering of doilies to create interest, and purposely planned some doilies to extend past the perimeter of my base fabric.

Once I was happy with my doily arrangement (which took several days of doing, leaving it, coming back to it and tweeking, etc.), I pinned them all on very well and started to stitch. I did the stitching using monofilament thread in clear so that it wouldn’t show, with lightweight bobbin thread in the bobbin. To avoid moving all the fabric around in a circular motion, I dropped my feed dogs and did it all ‘free motion’ after attaching my free-motion foot. This stitching took a LONG time and gave me some shoulder pains. Generally, I used a zigzag stitch. For the needle, I chose a size 80 denim (sharp-pointed) needle. See the backside of my project at this point below. I did ALOT of thread snipping and cut the doilies extending past the edges off – which was painful to do, I gotta say. Note how the stitching pulled up the backing fabric. I was a bit concerned about this, but with firm tugging and great care, when I stapled it to the backing board, all the puckers went away.

TO SECURE IT TO THE WALL…..
First, I had to decide on a method. I felt that the same way we have hung a heavy carpet type hanging would work, and it did. This involves using skinny sticks (I used yardsticks) with velcro stapled to it secured with bolts to the wall. The other side of the velcro stapled to the backside of the headboard. Obviously, making those strips match up was important. I used some industrial strength velcro we had gotten in the boat department at Academy Sports (the black strips) augmented with some that I purchased on Amazon – here is a link. With that overall picture in mind, here is my process….
I went to Lowe’s and decided on a 1/4″ plywood as the base, and had them cut it to my dimensions of 30″ x 60″. Crib-sized batting was put on one side, wrapping the edges and stapled to the backside. I used 5/8″ deep staples – which was really too deep. I had to hammer the ends down at the backside.

Next, I laid this padded headboard padding side down on the wrong side of the stitched fabric, and started pulling the edges around this backing base. This took ALOT of staples and a lot of pulling and tugging, working from the center of each side, then to the opposite side, then to the ends, and working my way out – all the time checking the right side to assure I was getting rid of puckers, but not pulling the doilies out of shape. I also trimmed out any excess batting that extended beyond the fabric ends as you can see in the picture to the right.

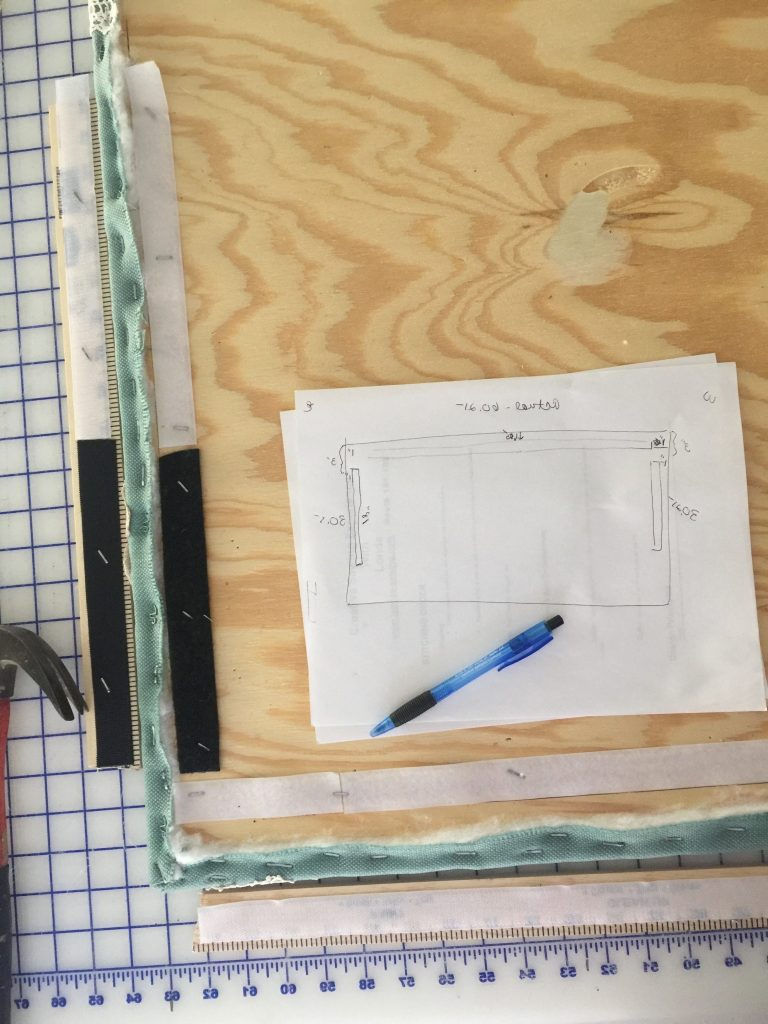
In the picture at the left above, you can see I measured and marked 1.5″ in from all sides. By doing this measuring and marking, I then had a straight line to which to butt the velcro strips for stapling. I then stapled the corresponding pieces of velcro to the yardsticks. Since my staples were 5/8″ and my yardsticks were 1/4″, that stapled them to my cutting mat! Oh well – a quick pry with the screwdriver and hammering the staple ends took care of that.
Positioning on the Wall
Then, I had to decide on the exact placement of my headboard on the wall. I knew I wanted the sham pillows to set up against the wall some, so I decided on the shams just slightly covering the bottom of the headboard. Remembering a technique from my interior design days, I created a ‘pattern paper’ using Swedish Tracing Paper to be the exact same size as my headboard. Next, I drilled 1/4″ holes through the yardsticks with the velcro on them at positions for bolting these to the wall. I decided on 4 along the top (should have been 5) and 2 on each side yardstick. Then, I measured in the same amount from each side of the paper to locate the velcro strip positioning of the headboard itself on my ‘pattern paper’. Poking my red pen through the holes to the paper gave me accurate locations to then put wall anchors into the wall, through the paper that I had attached to the wall (after measuring down from the ceiling and using a level to make sure I had it all aligned properly!). See the photo below. It is really a quite ingenious system, if I do say so myself! I learned it back when I was doing arrangments of lots of pictures above a sofa…we’d lay all the pictures out on the floor on a piece of big paper in front of the sofa. Then, marked hanging points for each. Then, moved paper to the wall, inserted nails where we’d marked, tore paper away and hung the pictures. WALA!

For the wall anchors, I used those big fat screw in ones. Next, I set my yardstick pieces up on the wall and inserted the screws, securing in tightly with the drill. Once the paper was torn off the wall, I simply positioned the headboard up against the wall – and WOW did it grab tightly! This thing is NOT going to fall off the wall – I assure you!


Comments